Basic/General App Questions
General FAQs:
I bought the book, why do I have to pay for the app? Shouldn’t it come free?
We totally get why you’d wonder about that—it’s a fair question.
When you buy the book, you’re getting a complete product on its own. Books are great because they’re easy to read, comfortable to use, and present everything in a clear, linear way. But by nature, they’re static—once they’re printed, they can’t be updated right away if something changes.
The app, on the other hand, is a separate product with a different set of strengths. It’s built on a custom system we spent years developing, and it’s designed to stay constantly up to date. If something changes—like a road closure, a business update, or even a major event—we can update the app quickly, sometimes hour by hour. It also includes extra features like interactive maps, location-based info, trip planning tools, and more content than we could ever fit in a book.
Because the app requires ongoing development, updates, and maintenance, it isn’t something we’re able to include for free with the book. That said, the two are designed to complement each other—some people love the reliability and feel of the book, while others really value the real-time updates and features in the app and some use both.
Why is there a subscription for the travel guide portion of the app?
As mentioned above, things in Hawai‘i are constantly changing—restaurants close, hotels change names, trails get washed out, and more. Keeping everything up to date is a big job, especially now that we’ve expanded beyond Hawai‘i.
A printed book is essentially a snapshot in time, while the app is continuously updated and can hold far more content. If we tried to update books as often as we update the app, we’d need to release multiple printings and new editions for each location every year—and publishing simply doesn’t move that quickly.
The subscription helps cover the ongoing work required to provide daily updates, real-time reports on conditions, closures, and other changes. In return, the app offers more up-to-date information and features, giving you more value overall.
How do I cancel my subscription?
Subscriptions renew automatically, and this is clearly explained at the time of purchase. Both app stores send renewal emails prior to being charged, so you may opt out.
If you’d like to cancel a subscription, you may do so at any time through your app store account:
- Apple App Store: https://support.apple.com/en-us/118428
- Google Play Store: https://support.google.com/googleplay/answer/7018481
If you have any trouble, feel free to reach out (info@revealedtravelguides.com)—we’re happy to help.
I’m having trouble creating/signing up for an account in the app.
We’ve found that the “fast login” option (using your Apple or Google account to quickly create an account) doesn’t always work smoothly with our system. In some cases, it also prevents us from locating your account on our end. For the best experience, we recommend creating your account by manually entering your email address and password.
If you did use fast login and purchased a travel guide subscription or drive tour but can’t access your content, please contact us at info@revealedtravelguides.com. We’ll make sure you get access to what you purchased—though we may ask you to provide a different email address to set things up.
This issue is related to how Apple and Google handle fast login, and it’s something many apps run into from time to time.
I bought the wrong section of the app by mistake. Can I switch it?
Switching between sections in the app can sometimes interfere with your subscription.
Because of this, the simplest solution is usually to request a refund through your App Store and then start again with the correct section. If it’s been less than 48 hours since your purchase, both Apple and Google typically allow refunds.
If you run into any issues, feel free to email us at info@revealedtravelguides.com with your proof of purchase found in your app store or your emailed receipt—we’re happy to help.
How do I share my app? And can I share it with someone on a different operating system?
You can share the app with others as long as you create your account using a manual email and password combination (not “fast login” with Apple or Google).
Here’s how it works:
- Create an account using your email address and a password.
- Have your travel partner download the app.
- When they open it, they should select “I already have an account.”
- They can then log in using your email and password.
This lets you both use the same app access, including your Favorites and Trip Planner—so there’s no need to pass phones back and forth.
I bought your app years ago but it doesn’t seem to be working?
Here are a couple of things you can try to fix the issue:
- Reinstall the app
Uninstalling and reinstalling the app often helps. Apps get regular updates that include bug fixes and performance improvements, so if yours has been installed for a while, reinstalling can refresh it and usually gets things working smoothly again. - Check if you have an older version
It’s possible you’re using an older version of the app that is no longer supported. If that’s the case, please email us at info@revealedtravelguides.com and we’ll help you get set up. If you have an active subscription or previously purchased a drive tour, please be ready to share your receipt or proof of purchase from your app store.
A quick note on versions: we’ve gone through a few generations of our apps. Older apps were called “Hawaii Revealed, Maui Revealed, etc.” While the newest version is called “Revealed Travel Guides.”
In the past, drive tours were separate apps, but now everything is combined into one app: “Revealed Travel Guides.”
If you still see an older app icon on your phone or in your app library, it may look different or have a different icon—but it’s no longer the current version.

Know that these products are no longer being sold, updated or maintained. Please make sure you have our latest version of Revealed Travel Guides. The icon looks like this:

My app isn't working when I am out of cell range?
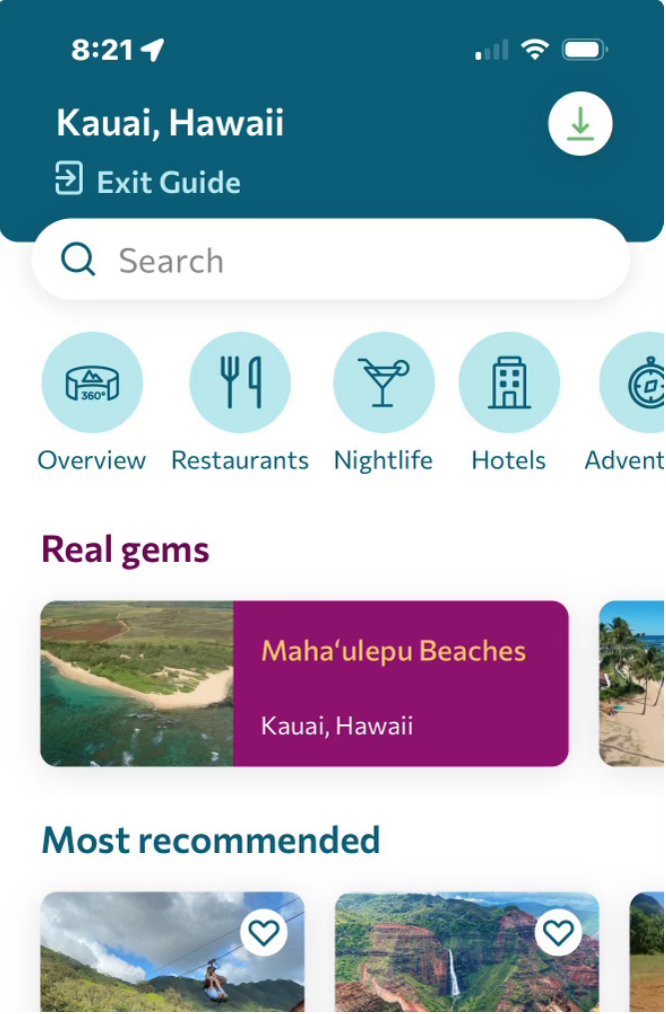
When you purchase the app, open the homepage for the location you want to use and tap the down arrow in the top right corner.
Make sure you’re in a strong WiFi or cellular area, then wait for the download to finish. It may take a little time, especially for the map to load. You’ll see a confirmation when it’s done.
For best results, stay on that screen until the download is complete.
Note: if you want to save memory when not using the app, simply delete it from your phone and that will remove all the map data, but your account settings like: favorites and trip planner will remain for your next visit.
Why can’t my app locate me on the map?
Both the Drive Tours and Location Guides need access to your location to work properly.
When prompted—or in your app settings—please set location access to “Only while using the app.”
This allows the Drive Tour to play automatically as you drive through each stop, and helps the Location Guide show your position on the map while hiking or find nearby places.
How to Get The Most From Our App:
How do I find what I need in the app?
There are a few easy ways to find what you’re looking for in the app:
- Use filters (best option!)
Most sections have filters to help you narrow things down. For example, if you want a restaurant near you that serves seafood, has alcohol, and an ocean view, just go to the Restaurants section and select those filters.
If you don’t see any results, try removing one filter at a time—you’ll usually start seeing more options that way.
When you find a place you like, you can tap “Favorite” and it will be saved for you under Favorites on the map.
- Search by name or keyword
You can also use the search bar on the homepage or inside any section.
- Looking for a specific beach? Type its name.
- Want “pizza” or “beach on the east shore”? Just search or filter for it.
- Helpful beach info
For beaches, we include daily surf reports for every beach. When you open a beach listing, the surf report will pop up automatically. You can read it and easily close it when you’re done. If the surf is up, it may be time to rethink your day.
These tools are all designed to help you quickly find exactly what you need without scrolling endlessly.
Do the Drive Tours have a start point?
Nope—you can start driving from wherever you are.
Just open the Drive Tour map and find your location. You’ll see arrows showing the route options from there. In some areas, we also suggest the best direction to go. For example, driving south from Kona toward Volcano gives you the most stops, and going clockwise to Hana offers the best views.
The map is designed to help you easily see the recommended routes, so you can choose what works best for your trip.
The Drive Tour volume is not working correctly. It cuts in and out or goes soft or doesn’t play at all. How do I fix that?
Some car stereos work perfectly with our app, but others may have issues like audio cutting out, tracks not playing properly, or volume dropping unexpectedly.
If you run into this, try disconnecting the app from your car’s Bluetooth or stereo system. You can then plug your phone into the AUX input (if available) or simply use your phone’s speakers.
If everything works normally that way, the issue is likely with the car stereo connection rather than the app. In that case, we recommend just using your phone’s audio instead—it works great and keeps things simple.